Tuesday 22 December 2009

Running in a different vein..


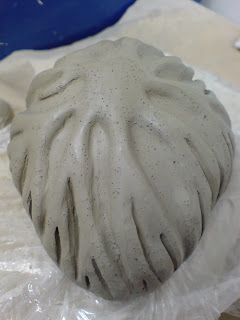
Something a bit more complicated to cast with this one! Should still be able to do it in two parts, but need to finish off sorting out the undercuts and fill the cavities which are a little too deep. Will continue after assessment. Will slip cast and wax cast it. Might crack one in half and glaze the inside.

Saturday 19 December 2009

Velvety foetus didn't turn out bronze at all..


Experimented with mixing own glazes and slips using the manganese dioxide, copper dioxide and red clay, but it didn't quite turn out as expected! The spherical object is a tester displaying the desired finish, but it ended up having this velvety-black finish, which I think works better on this form as it looks softer and more tactile. I did bisque fire it, then paint the glaze/slip on, then fired it again, but you can paint the oxide slip onto unfired clay and put it straight into the kiln and fire just once.
The last image is the slip cast 'foetus' next to the wax one, which shows the shrinkage when it has been fired. It doesn't compromise the form or concept at all, but it's worth bearing in mind when making future work.

Monday 14 December 2009

Gloopy tail chasing foetuses are out


They came out pretty good I think! The pewter metallic glaze dripped onto the kiln shelf - remember to put more sand on the shelf to catch it next time.
Been looking into mixing own glazes with manganese dioxide, copper oxide etc. These glazes do not have a flux (glass) in the glaze so therefore should technically not stick to the kiln shelf, but should use props just in case.
Put the middle sized foetus in the small kiln today and will glaze with metallic glaze or black glaze, depending on how the sample of the manganese oxide one comes out. It should look like bronze! The iron in the red clay gives it that bronze/golden look. So, painted on teracotta clay, it would look more bronze/gold, and by using less or more of the ground red clay in the oxide mixture, it will affect the end result of the glazed piece.
Thinking of displaying these on white satin or silk cloth.

Sunday 13 December 2009

A middle sized foetus


In the process of making a series of 'foetal' forms for display on silk. Either in the open air on silk or in giant glass jars. I don't want to cocoon these forms as they are designed to sit on a flat surface, so wouldn't be right all strung up.
Made the form in clay, then cast in red wax and secondly in white earthenware. The w. earthenware one is still drying, and will be glazed in a metallic or black gloss glaze. The opening on this one is my least favourite, as it is in the wrong place, and the shape looks like a hole that I'm trying to cover up. Thinking of ways to sort that out for display.

Foetal forms


Interested in things out of proportion, that come from the body. Things you cannot usually see, so imagination takes over and produces these forms. They look like they can breathe, move and grow, like any other living creature.
Made a two part mould again with a pour hole, the same as the 'heart' mould. The hole is much more of a regular shape than the ones in the 'hearts', so made it bigger purposely. Looks like a whale mouth!
They are both slip cast in white earthenware, one glazed with P0135 English Pewter Metallic 500MIs, and the other with P0018 Mirror Black Semi Transparent. Fired at 1040 degrees. Waiting to see what they come out like on Monday!
Interested in casting these in glass wax, and putting 'eggs' inside. But need to use a silicone mould, and that is expensive! Need to do more research on that before I go ahead and buy all the materials.
They will be displayed in the formation shown above, on silk. They appear to be eating each other, or chasing each other's tails. Circle of life?

Fixing the broken 'heart'..


One of the 'hearts' got broken by accident, but sometimes accidents produce interesting new forms..
Sanded it down a bit and drilled holes around the opening with a 3mm drill bit, ready to sew it up after firing, or to sew an appendage on - whichever fits the bill when it comes to it..
The glaze ended up filling some of the holes, and has sealed them with golden metallic 'plugs'.
I found that I'm more interested in the openings and cave-like structure of the forms, than the forms themselves, so will concentrate on the 'vessel' and dissecting things, cutting into the form and splitting it apart, in future objects to be made..
The reflectiveness of the glaze is not apparent in these photographs, but in the flesh you can see a distorted reflection in the centre.
Might fire the shards that remain of the rest of the heart at a later stage, but at the moment I don't feel they are intrinsic to the piece as it is now.

Porcelain and white earthenware 'hearts'.


Using the same mould as the wax 'hearts', I've been slip casting in porcelain and also white earthenware. The brush on glazes seem to take better with the white earthenware casts.
The first cast was in porcelain, and it collapsed a bit as it was taken out of the mould too early. It takes a while to get the timings right. The second try was much more successful. The seams were cleaned up before leaving to dry out for 5-7 days, then fired. Before firing, it is clear to distinguish between the porcelain (which is white) and the white earthenware (which is grey), but care must be taken not to mix them up if firing in the same kiln, as when they come out they are both a very pure white colour. It's very hard to tell the difference!
One porcelain 'heart' was glazed with 'white opaque gloss glaze 500 MIs' P0064. The other porcelain heart was glazed with 'Sky Blue leadfree brush on glaze' P2825. I glazed the white earthenware heart with the same white opaque gloss glaze as the porcelain heart (the one that had lost its form a little bit). They were fired at 1040 degrees.
The white porcelain heart had tiny little cracks all over it, which in fact portrayed the fragility I was going for, so I brought the cracks out with some ink.
The white glazed w. earthenware came out crack-free, but the seam was still showing slightly. Should've sanded it down a bit more before glazing! The sky blue porcelain heart came out well, the glaze around the opening made it look soft and inviting. The only thing was that there were cracks but they are not visible until you get up close. I could do it again, this time in w. earthenware if I wanted to minimise the risk of cracking.

Saturday 12 December 2009

Back to the wax 'heart'


This is the result of combining the original wax cast of the organ, with the binding of the object with a fine thread, ultimately cocooning it, to protect and restrict the object. It will be displayed, hanging from something (not sure what yet) so as to stumble upon the object like you would something caught in a spider's web. It does not command your attention. You would only notice it if you happened to be walking through at that particular time. Any later and it might be eaten or blown away..

Monday 30 November 2009

Lace beginnings..


Taught myself how to make lace for the tiny feotal peices I want to make. It's pretty fiddly! Get tangled up a lot. But at least I know how to do it now. Thinking about beating dome shapes out of metal to use as a base plate to display the free-hand lace pieces (NOT squares or doilies!), and weld pins to hold the piece in place.

Wax 'hearts'


Been casting in wax, porcelain, and white earthenware but here are the wax ones from a couple of weeks ago. They are more fragile than they look! Burnt myself a few times but they came out alright. Need to make a metal base and post to display them. Will go into welding bay tomorrow and have a go (hopefully - after essay is handed in!). Might try displaying on hand made silk pillow. Will try both.
The blue one is parrafin wax and (I think,) a thin layer of microcrystalline wax on the inside. The red one is just paraffin wax, which is why it's much more fragile.
The mould has held up pretty well considering I've been casting in wax and slip!
The mould I made after this one (not pictured - more 'feotal'), didn't work out so well! Still working on it though, I'll update when I've got more to show.

Sunday 1 November 2009

Waxing it up


First attempt at wax casting!
Firstly made my object in clay, which took about 5 minutes.
Then, made the plaster mould, which seemed to take about 5 days! (But probably only really took 1..).
Poured the melted wax into the precious mould, and voila! A nearly beating heart for me to play with..

Thursday 22 October 2009

Using gravity..


Here are some works that I created to hang from a hook (maybe a meat hook?) Just playing around with different modes of display. Using more muted colours (if you can call them that?!) to see what people's reactions were going to be. Presented them at the seminar and people reacted to them in a very inquisitive way. Described as cute, melancholy, sea creature-like, reminded people of fishing nets - washed up and tangled, jellyfish, alien. Looked like something had crawled through certain parts and set up home in others.. Make up your own mind..